Under MIT License
pbtweetをMITライセンスにしてる理由を書いた。
http://pbtweet.blogspot.com/2009/08/under-mit-license.html
というわけで、だれかFirefox版やらね?マジで。あのブラウザ起動するのとか見るのとか苦痛なんだよね。
pbtweet on Snow Leopard
http://pbtweet.blogspot.com/2009/08/pbtweet-on-snow-leopard.html
pbtweetをSnow Leopardで使う方法について。
という3つの方法があるよ、って記事。
pbtweet 1.5のGrowl風Notificationまわりのコードなど晒す。
pbtweet 1.5ではGrowl風のNotificationやってるんだけど( http://img329.yfrog.com/i/5y3.mp4/ )WebKitのCSS3前提で作ってるんでものすごくシンプルに作れた。jQueryとか難しくてよくわかんないのだけど、使うともっと簡単になるんだろうな。勉強が足りないなーと思ったりすることしきりだ。
CSSはこんな感じ。
.Notifire {
	margin-left: 13px;
	margin-top: 10px;
	width: 450px ;
	min-height: 40px;
	clear : both ;
	-webkit-box-shadow: 0px 4px 4px rgba(0%, 0%, 0%, 0.4) ;
	-webkit-border-radius : 8px ;
	opacity : 0 ;
	-webkit-transform : translate( 0px , -20px) ;
	-webkit-transform-origin : 50% 50% ;
	-webkit-transition : -webkit-transform 0.2s ease-in , opacity 0.4s ease-in ;
}

#notifire_canvas .Notifire-popon{
	opacity : 1 ;
	-webkit-transform : translate( 0px , 0px ) ;
}

#notifire_canvas .Notifire-pushout {
	opacity : 0 ;
}
javascriptはこんな感じ
function Notifire()
{
	var self = this;

	var card = document.createElement('div');
	card.setAttribute( 'class' , 'Notifire');
	card.id = guid();
	this.card = card;

	var icon_wrapper = document.createElement('div');
	icon_wrapper.setAttribute( 'class' , 'icon' );
	card.appendChild( icon_wrapper );

	var icon_image = document.createElement('img');
	icon_image.setAttribute( 'class' , 'icon' );
	icon_wrapper.appendChild( icon_image );
	this.icon_image = icon_image;

	var description = document.createElement('div');
	description.setAttribute( 'class' , 'description' );
	this.description_container = description;
	card.appendChild( description );
}

Notifire.prototype =
{
	get notify_id ()
	{
		return this.card.id;
	} ,

	set notify_id ( current_id )
	{
		this.card.id = current_id;
	} ,

	get icon ()
	{
		return this.icon_image.src;
	} ,

	set icon ( src )
	{
		this.icon_image.src = src;
	} ,

	get description ()
	{
		return this.description_container.innerHTML;
	} ,

	set description ( x )
	{
		this.description_container.innerHTML = x;
	} ,

	get priority ()
	{
		return this._priority;
	} ,

	set priority ( x )
	{
		this._priority = x;
		switch ( x ) {
			case -1:
				this.card.style.backgroundColor = 'rgba( 0 , 0 , 0, 0.75)';
				break;

			case 0:
				this.card.style.backgroundColor = 'rgba( 60 , 10 , 20 , 0.75)';
				break;

			case 1:
				this.card.style.backgroundColor = 'rgba( 80 , 0 , 0 , 0.75)';
				break;

			default:
				this.card.style.backgroundColor = 'rgba( 24 , 24 , 24 , 0.75)';
				return;
		}
		return;
	} ,

	pop_on : function(delay)
	{
		document.getElementById( 'notifire_canvas' ).appendChild( this.card );
		var my_id = this.notify_id;
		setTimeout( function()
			{
				addClass( document.getElementById(my_id) , 'Notifire-popon' );
			} , delay * 200 );
		return;
	} ,

	push_off : function()
	{
		addClass( this.card , 'Notifire-pushout' );
		if( !arguments[0] )
		{
			var my_id = this.notify_id;
		}
		else
		{
			var my_id = arguments[0];
		}
		setTimeout( function()
			{
				document.getElementById('notifire_canvas').removeChild( document.getElementById( my_id ) );
				delete this;
			} , 300 );
		return;
	} ,
}

// Notificationを出すためのdiv用意して……
var notifire_canvas = document.createElement('div');
notifire_canvas.id = 'notifire_canvas';
notifire_canvas.style.position = 'fixed';
notifire_canvas.style.width = '450px';
notifire_canvas.style.top = '0px';
document.body.appendChild(notifire_canvas);

//こうやって呼び出す。
var new_notify = new Notifire();
new_notify.description = messages.description;
new_notify.icon = messages.icon;
new_notify.priority = messages.priority;
new_notify.pop_on(on_delay);
setTimeout( function()
{
	new_notify.push_off();
} , off_delay );
追記
エディタで見てるときはけっこうシンプルに見えてたんだけどはてダで見たらぜんぜんシンプルに見えないや。やっぱりダサコードだな。どうせ晒しだし、jQueryも使えんような初心者のコードなんてだれもコピペしないだろうからこのまま置いとく。
flic.kr で使われている base58 のデコードを行う javascript のコード
http://www.flickr.com/groups/api/discuss/72157616713786392/ の php を参考に作ってみた javascript です。
pbtweet で flic.kr の URL をデコードするために使っています。
function base58_decode( snipcode )
 {
	var alphabet = '123456789abcdefghijkmnopqrstuvwxyzABCDEFGHJKLMNPQRSTUVWXYZ' ;
	var num = snipcode.length ;
	var decoded = 0 ;
	var multi = 1 ;
	for ( var i = (num-1) ; i >= 0 ; i-- )
	{
		decoded = decoded + multi * alphabet.indexOf( snipcode[i] ) ;
		multi = multi * alphabet.length ;
	}
	return decoded;
}
だれかがもうどこかに公開してるんだろうけど情弱なんで見つけきれなかったよorz...
っていうか、こんなのデコードするのに for 使うとか頭悪すぎるような気がしてきたけど、とりあえず動くんで晒してます。歳食ってからプログラムなんて始めるもんじゃないなぁ。
pbtweetのlocalstorageコード晒し
localstorageがないときはcookie使うようにしてる。ちなみに下記コードだとFirefoxでは判定に失敗する。原因を探すのも面倒なのでGreasemonkey版は強制的にcookieに保存するようにしてる。
簡単な設定値程度なら下記コードでcookie or localstorageに保存すればいいけど、長いデータはlocalstorageに保存することになるね。
//Client side storage handler
function restore_pb_values()
{
	chain_count = get_storage_Value( 'pb_chain_count' ) ? get_storage_Value( 'pb_chain_count' ) : 4 ;
	pb_lang = get_storage_Value( 'pb_lang' ) ? get_storage_Value( 'pb_lang' ) : navigator.language.substr( 0 , 2 ) ;
	enable_accesskey = get_storage_Value( 'pb_enable_accesskey' ) ? get_storage_Value( 'pb_enable_accesskey' ) : false ;

	window.onbeforeunload = function ()
	{
		return save_storage_Changes();
	};
}

function clearAll()
{
	localStorage.clear();
	sessionStorage.clear();
	restore_pb_values();
}

function set_storage_Value( key , value )
{
	if ( is_localstorage() )
	{
		localStorage.setItem( key , value );
		sessionStorage.setItem( key , value );
	}
	else
	{
		document.cookie = key + "=" + value + "; expires = Thu, 1-Jan-2030 00:00:00 GMT;" ;
	}
}

function get_storage_Value(key)
{
	if ( is_localstorage() )
	{
		return( localStorage.getItem( key ) );
	}
	else
	{
		var cookies = document.cookie.split("; ");
		for ( var i = 0 ; i < cookies.length ; i++ )
		{
			var str = cookies[i].split( "=" );
			if ( str[0] == key ) {
				return( unescape( str[1] ) );
				break ;
			}
		}
	}
}

function save_storage_Changes()
{
	set_storage_Value( 'pb_chain_count' , chain_count );
	set_storage_Value( 'pb_lang' , pb_lang );
	return NULL;
}

function clearValue( value )
{
	if (value == 'myfield1')
	{
		sessionStorage.removeItem( alue );
	}
	else
	{
		localStorage.removeItem( value );
	}
	document.getElementById(value).value = '';
}

function is_localstorage(){
	if (typeof(sessionStorage) == 'undefined' || typeof(localStorage) == 'undefined')
	{
		return(false);
	}
	else
	{
		return(true);
	}
}
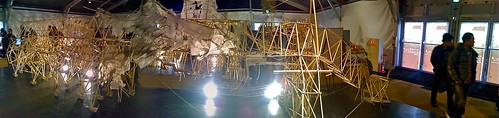
テオ・ヤンセン展
日比谷パティオで開催中のテオ・ヤンセン展にいってきた。
Theo Jansen テオ・ヤンセン展公式HP
プラスチックチューブが結束バンドで結びつけられた「生命」体が展示されていた。砂浜で海風を受けて動き回る本来の姿からはほど遠いのだろうが、短いデモンストレーションで動いていた大きなAnimaris Modulariusは圧巻だった。風を動力に変えて動くだけではなく障害物に反応して動く方向を変えるというフィードバック系、蓄えた風を圧搾空気として蓄える能力を備えている。これで複製したら生き物と変わらないよ。宇宙人がオランダの海岸にうごめく彼らとメンテナンスしているTheoを見たとき、どちらを「生きている」と感じるだろう。
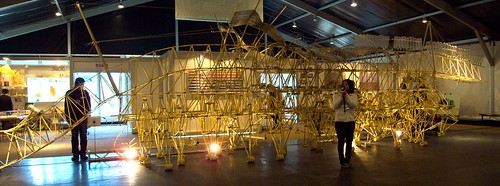
TheoのAtari、スケッチ、様々なジグなどが展示されているアトリエパートと「生きている」2体が展示されている中央のスペース、そして化石と称される動かなくなってしまったオブジェの展示スペースが用意されていて、デモンストレーションまで含めて40分程度で全部を見ることができる。
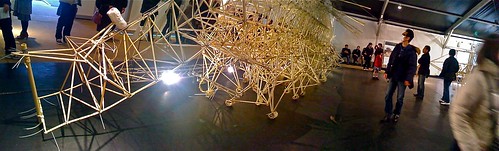
いくつかの展示物は触ることもできるし、そうでないものにもかなり近寄れるのだが、ネジやヒンジのような金物で作られた構造を見慣れているのでプラスチックチューブが結束バンドや紐で結びつけられているクラフトワークには圧倒される。
フランクな雰囲気のスタッフがあちこちで説明しているので、話を聞くのもいいかもしれない。
小さな展示で1,500円とちょっとお高めではあるけど、満足。